Unlock the potential of online presence by learning how to start a blog with Bluehost and WordPress. This comprehensive guide is tailored for aspiring bloggers, regardless of their technical background. Bluehost stands out as an exceptional choice for beginners, eliminating the need for prior web design or web development experience. Whether your ambition is to launch a professional blog for business growth or simply to pursue a passionate hobby, understanding why a Bluehost blog is crucial is your first step towards online success. Dive into this detailed tutorial to master how to start a WordPress blog on Bluehost in 2024, complete with clear, step-by-step instructions, transparent pricing insights, and invaluable tips to kickstart your digital journey.
Today, you will embark on the exciting journey of learning how to create a professional WordPress website with Bluehost. Opting for a self-hosted blog provides unparalleled freedom and flexibility, allowing you to establish a thriving online business from the comfort of your home, with a schedule that perfectly adapts to your lifestyle. The ability to control every aspect of your website, from design to monetization strategies, sets self-hosting apart from other platforms.
If your long-term goal involves transforming your blog into a profitable online business, choosing a self-hosted WordPress.org platform offers significantly greater monetization potential compared to free blogging platforms. This includes popular options like Wix, Blogger, Blogspot, and WordPress.com. A blog hosted on WordPress.org with Bluehost not only gives you full ownership of your content and data but also projects a more professional and credible image, which is essential for businesses and services aiming to build trust and authority online. This foundation is critical for attracting advertisers, engaging in affiliate marketing, and ultimately, building a sustainable income stream.
This article is specifically designed to be a comprehensive guide for beginners interested in Bluehost. To ensure everyone starts on the same page, let’s begin by defining the core components you’ll need to start a WordPress blog on Bluehost or any other hosting provider:
- Hosting Plan: At its core, a hosting plan represents the rented digital space on the internet where your website’s files, databases, and content reside. Your web host acts as your digital landlord, providing the servers and infrastructure necessary for your site to be accessible globally. In this context, Bluehost is your chosen web host. A helpful analogy often used is to think of your hosting plan as renting a physical office space for your business – without it, your business has no physical address or presence.
- Domain Name: Your domain name is the unique, memorable address that visitors type into their web browsers to find your site. For example, you are currently visiting me at my domain name, SummerYule.com (Welcome!). It’s your website’s identity and brand online. Just like a physical address, if you fail to pay your “rent” (hosting fees), you risk losing access to your “address” (domain name), potentially allowing others to claim it. Choosing a good domain name is crucial as it becomes synonymous with your brand.
- Blogging Platform: The blogging platform is the content management system (CMS) that serves as the backend interface for creating, managing, and publishing your website’s content. It’s where you add new posts, pages, images, and other “home improvements” to your site. This area is typically accessed only by you and authorized users, not your public website visitors. For this guide, we are focusing on WordPress.org as our robust and versatile blogging platform, known for its extensive features and customization options.
⭐ Why Choose Bluehost for Your WordPress Blog?
While there are numerous paid hosting providers available that support sites with ads and affiliate marketing, such as AWS, SiteGround, A2 Hosting, BigScoots, or GoDaddy, a common question arises: Why use Bluehost for web hosting? The primary factor that often sways new bloggers and small businesses towards Bluehost, especially when weighing options like BigScoots vs Bluehost or Bluehost vs GoDaddy WordPress Hosting, is its exceptional value and affordability.
Bluehost offers shared hosting plans that are incredibly budget-friendly, making it one of the most inexpensive options for aspiring bloggers. While shared hosting might not offer the lightning-fast speeds of premium VPS or dedicated servers, Bluehost provides reliable service with minimal downtime, ensuring your blog remains accessible to your audience. This balance of cost-effectiveness and reliability makes it an ideal starting point. Indeed, a significant number of successful bloggers, including myself, began their online journey with Bluehost, scaling up as their traffic and needs evolved. Bluehost’s official recommendation by WordPress.org since 2005 further solidifies its reputation as a trusted hosting partner.
Compelling Reasons to Start a Blog on Bluehost
Beyond its attractive pricing, here are several other compelling reasons why you’ll want to start a blog on Bluehost:
- Free Domain Name for the First Year: One of the most significant perks of choosing Bluehost is the inclusion of a free domain name registration for your first year. This benefit alone can save you between $10-$20 annually, providing immediate savings for new bloggers. (Note: some premium domains may incur extra costs, but standard .com, .net, .org are usually included).
- Remarkably Easy Setup Process: Bluehost is renowned for its user-friendly interface and streamlined setup process, making it incredibly accessible for individuals with no technical background. This guide will walk you through precise, step-by-step directions on how to start a blog on Bluehost and WordPress. You’ll be genuinely surprised at how straightforward and quick it is to learn how to start a blog on WordPress with Bluehost’s intuitive platform.
- 24/7 Customer Service via Online Chat or Phone: Technical challenges are inevitable when launching and managing a website. Bluehost offers robust 24/7 customer support, accessible through online chat or phone. If you encounter any issues while learning how to launch a WordPress site on Bluehost, their knowledgeable support team is readily available. From my personal experience, the customer service agents at Bluehost have always been responsive and helpful in resolving various technical queries and issues promptly.
- Free Custom Email Address Trial: Professionalism is key for any online venture. Bluehost provides a trial for a free custom email address that matches your domain (e.g., [email protected]). This feature allows you to maintain a professional brand image by avoiding the use of personal email addresses for business communications, further enhancing your credibility and saving you the cost of a separate email service.
- Free Staging Site for Experimentation: Bluehost empowers you with the ability to create a free staging site. A staging site is a private clone of your live website where you can safely experiment with new themes, plugins, design changes, and content updates without affecting your live audience. This invaluable feature minimizes risk and ensures that any changes are thoroughly tested before being deployed to your active blog.
- 30-Day Money-Back Guarantee: Bluehost stands by its service quality, offering a 30-day hosting money-back guarantee for new users. This policy allows you to try their hosting service completely risk-free. It provides peace of mind, knowing that if Bluehost doesn’t meet your expectations within the first month, you can request a full refund. This commitment to customer satisfaction truly means you have nothing to lose by giving them a try.
To make this deal even sweeter and to support my readers, I’ve partnered with Bluehost to provide an exclusive offer. For a limited time, you can access this special discount by clicking the button below:
➕ How to Start a Blog with Bluehost and WordPress in 2024: A Step-by-Step Guide
Are you ready to learn how to start a blog on WordPress with Bluehost in 2024? This comprehensive tutorial will guide you through each essential step, ensuring a smooth and successful setup for your brand-new blog.
1. Visit Bluehost and Select Your Web Hosting Plan
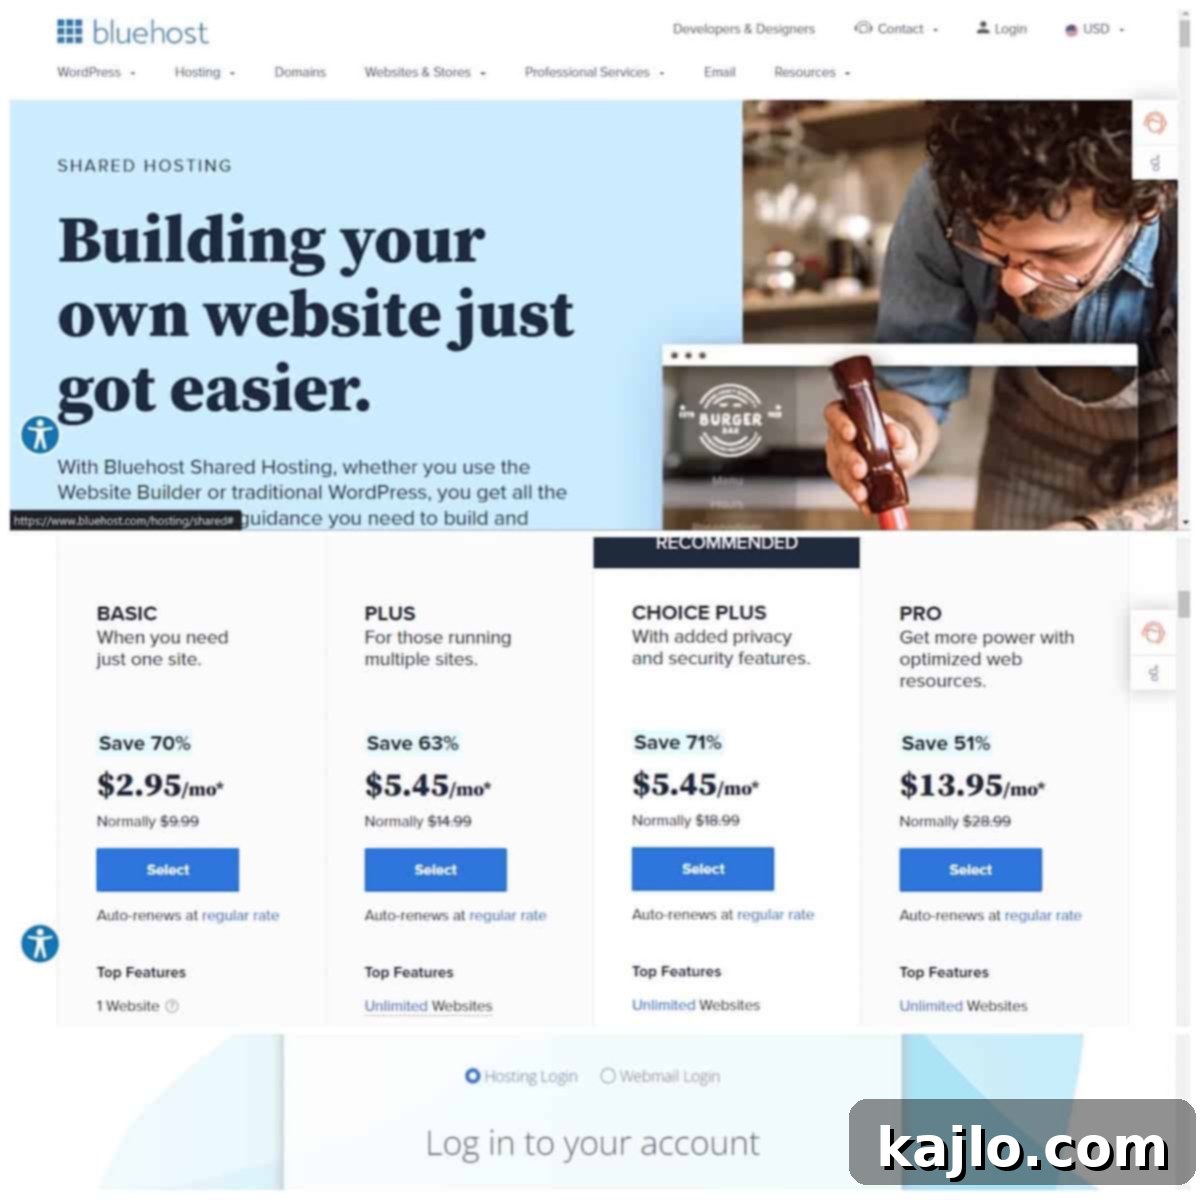
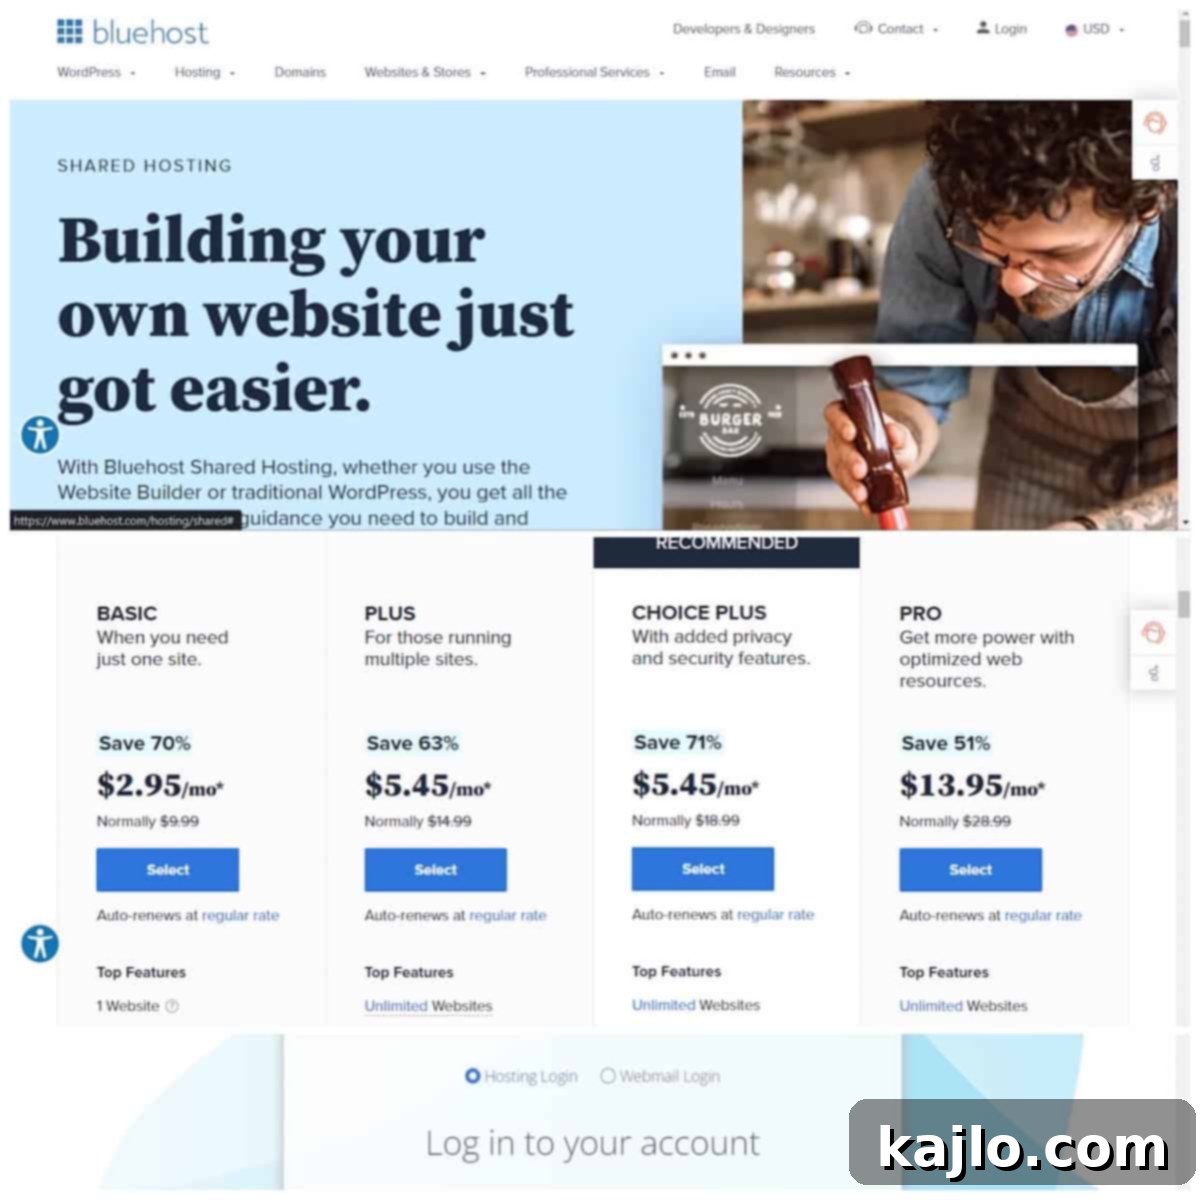
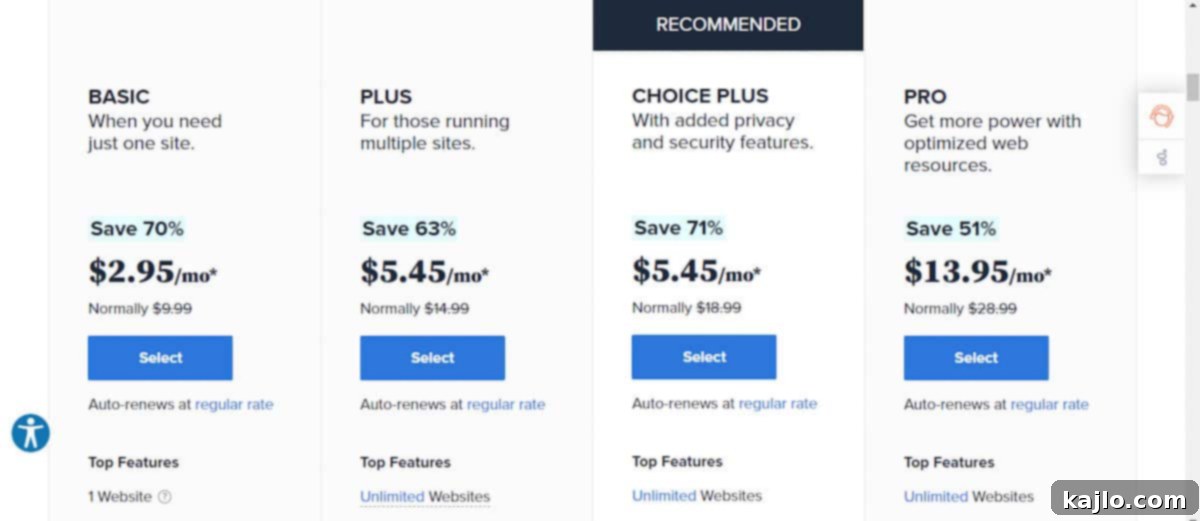
Your first step is to visit the official Bluehost website and explore their hosting plans. For most new bloggers, the Basic plan, starting at an incredibly affordable $2.95 per month, is highly recommended and perfectly sufficient. This is the plan I personally started with. However, Bluehost offers a range of plans designed to accommodate various needs, including options for running multiple websites or requiring more robust resources.
| Bluehost Plan | Price (per month) | Key Features & Ideal Use Case |
|---|---|---|
| Basic | $2.95 | Perfect for one site, 10 GB SSD Storage, unmetered bandwidth. Ideal for new bloggers. |
| Plus | $5.45 | Supports unlimited sites, 20 GB SSD Storage, unmetered bandwidth, free CDN. Great for growing portfolios. |
| Choice Plus | $5.45 | Includes all Plus features, plus Free Domain Privacy and Free Automated Backups for the first year. Best value for enhanced security. |
| Pro | $13.95 | All Choice Plus features, plus Optimized CPU Resources, Dedicated IP, and higher performance. Suited for high-traffic or resource-intensive sites. |
Once on the pricing page, scroll down to review the plans and select the button corresponding to your preferred plan. At the time of writing, the 12-month Basic plan offers the most attractive entry price at $2.95 per month. While a 36-month plan is also available at $4.95 per month, it’s worth considering your long-term commitment.
When I initially signed up for Bluehost, I secured a 36-month plan at a promotional rate of $2.95 per month. However, my site grew rapidly, and I found myself needing to upgrade and switch hosts after only two years, effectively paying for a year I didn’t fully utilize. For many beginners, starting with a one-year plan is a flexible and perfectly adequate option, allowing you to assess your needs before committing to a longer term.
2. Choose Your Domain Name
This pivotal step involves selecting your domain name, which will serve as your website’s unique URL and primary online identity. This is a significant decision, so choose wisely! Your domain name should ideally be memorable, easy to type, and relevant to your blog’s niche. If you haven’t yet finalized your blog’s specific focus, it’s perfectly acceptable to use your own name, as I did (SummerYule.com). This personal branding approach offers flexibility as your blog evolves.
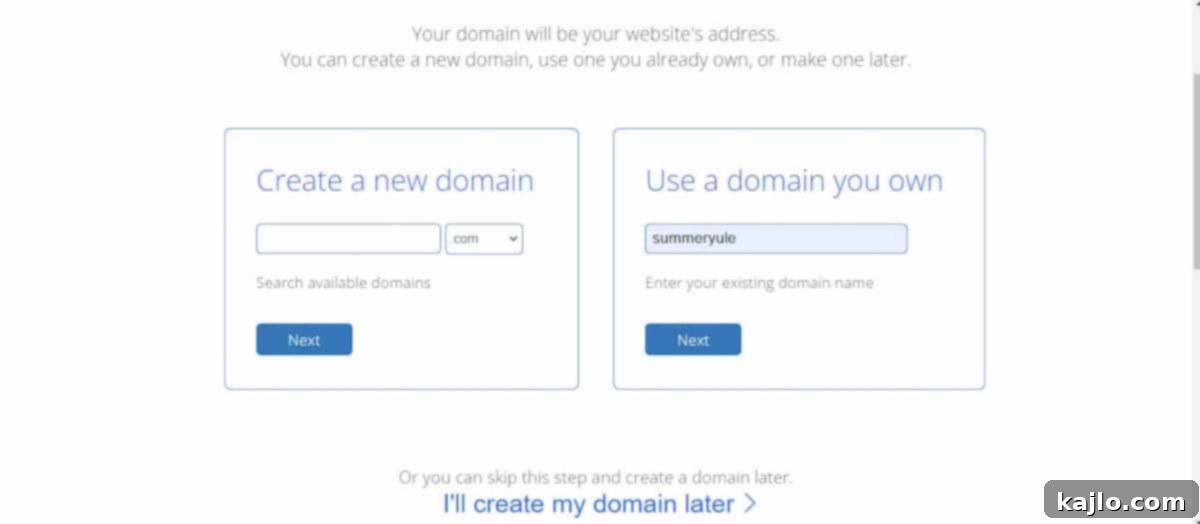
During this stage, you might find that your preferred domain name is already taken. Don’t be discouraged if this happens; you’ll simply need to brainstorm alternative names. Bluehost provides suggestions, or you can try variations of your original idea. If you’re still undecided or wish to defer this choice, you have the option to click “I’ll create my domain later.” This allows you to proceed with setting up your hosting and select your domain at a later, more convenient time from your Bluehost account dashboard. Otherwise, proceed with registering your chosen domain name immediately.
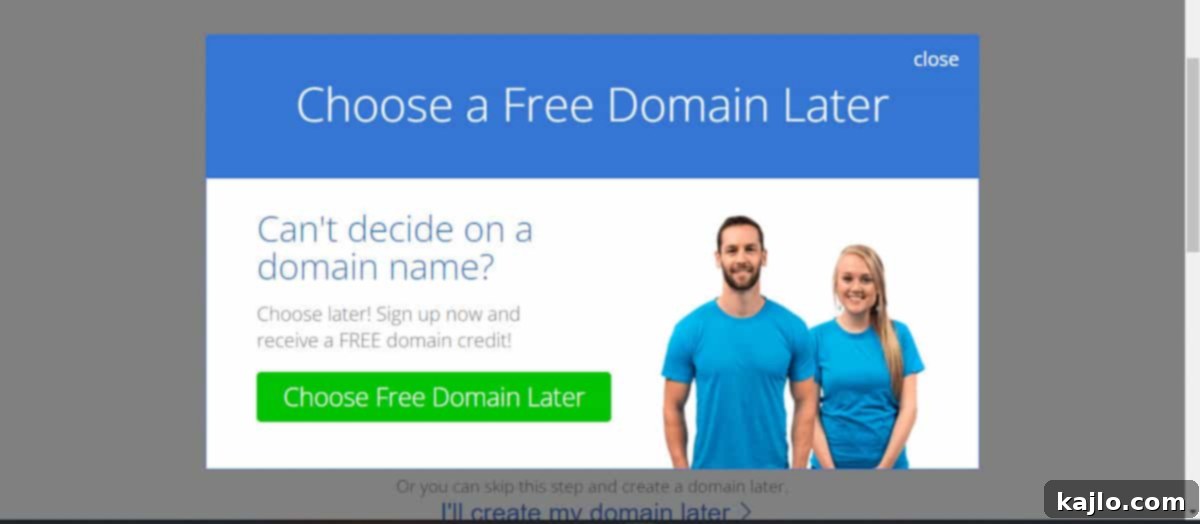
3. Complete Your Bluehost Account Information and Review Add-ons
Next, you’ll be prompted to fill in your essential account details, including your name, address, email, and phone number. Ensure all information is accurate, as this will be linked to your hosting account.
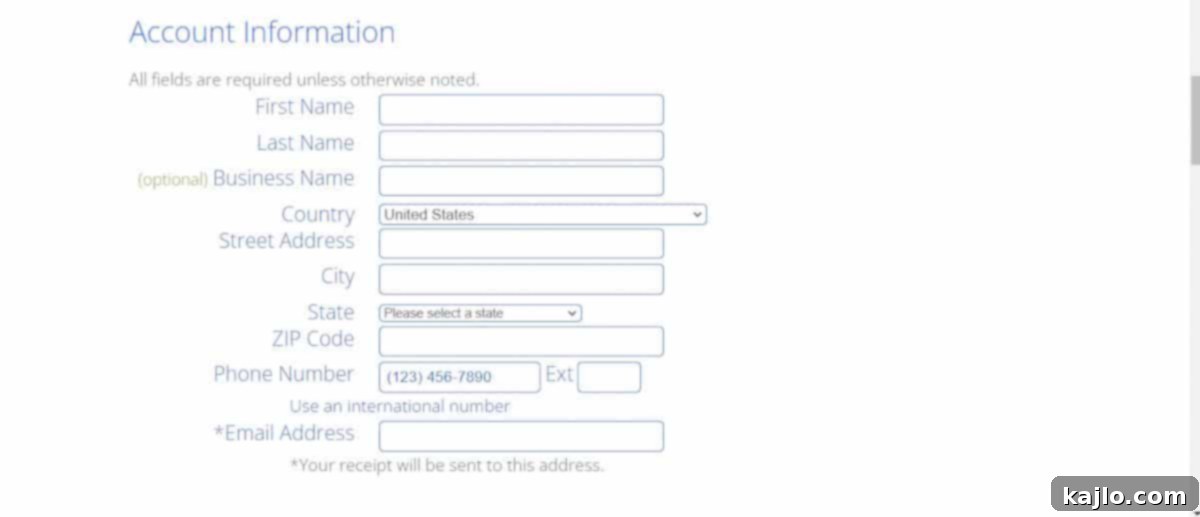
As you scroll down the page, you’ll notice Bluehost presents a variety of optional package extras. These add-ons, while potentially useful, can easily increase the overall cost of your web hosting, sometimes doubling or even tripling your initial monthly price. It’s important to carefully review these before making a selection.
For a beginner blogger, the only extra I would genuinely consider is Domain Privacy Protection. This service, typically around $15 per year, keeps your personal information (name, address, phone number) private by shielding it from the public WHOIS database, which lists website owners. It’s akin to having an unlisted phone number and can be added after your initial signup.
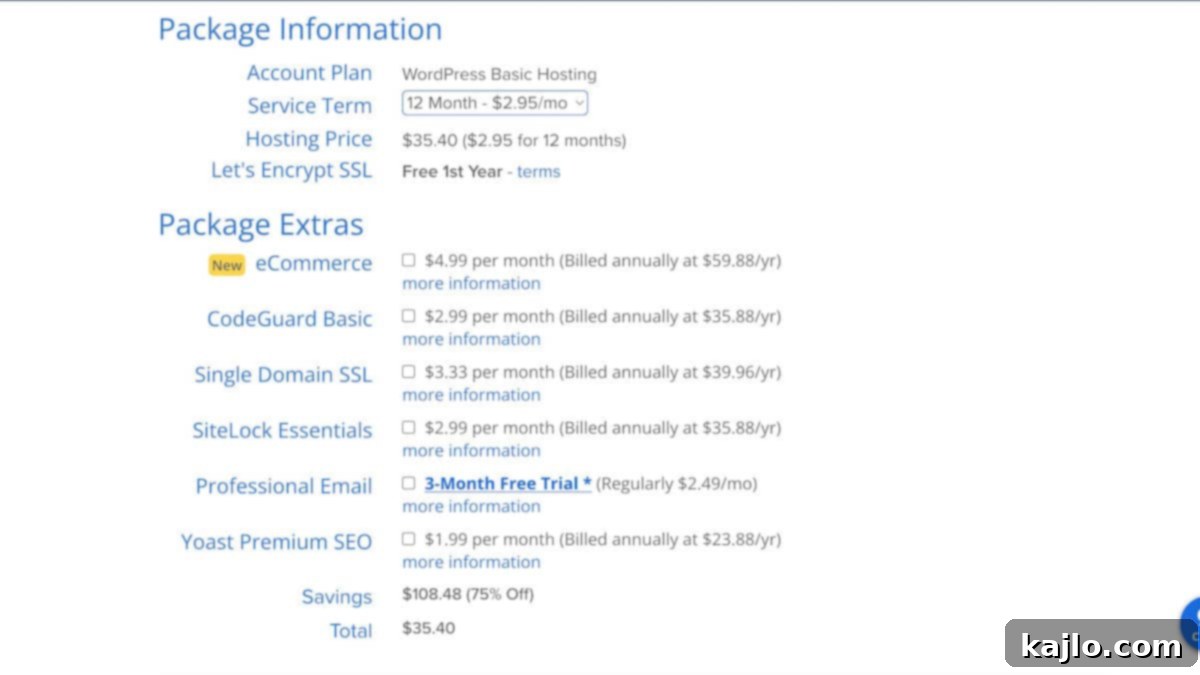
Here’s a breakdown of the other common package add-ons and why you might (or might not) need them as a beginner:
- eCommerce: This add-on provides a streamlined setup for an online store using WooCommerce and integrates payment processing. At $4.99/month, it’s only necessary if you plan to launch an online shop immediately. For most blogs, this can be added later as your needs grow.
- Codeguard Basic: Priced at $2.99/month, Codeguard offers daily automated backups for your site and the convenience of one-click website restoration. While backups are crucial, the Basic plan typically doesn’t include this, but Bluehost’s Choice Plus plan offers automated backups for the first year. Alternatively, free WordPress plugins like UpdraftPlus can provide similar functionality.
- Single Domain SSL: You are already getting a free Let’s Encrypt SSL certificate with your basic Bluehost package, which is perfectly sufficient for beginners. This encrypts data between your site and visitors, ensuring security. There’s no need to pay an additional $3.33/month for a premium SSL certificate at this stage.
- SiteLock Security Essential: This automatic monitoring tool helps protect your site from malicious attacks and malware for $2.99/month. However, for cost-conscious beginners, installing the free WordFence plugin for site security offers excellent protection without additional monthly fees.
- Professional Email: While Bluehost offers a 3-month free trial for a professional email that matches your domain (regularly $2.49/month), you’ve already secured a trial for a free custom email as part of your Bluehost package. This add-on might offer more advanced features, but for basic professional email, the included option is usually fine.
- Yoast SEO Premium: Learning search engine optimization (SEO) is undoubtedly vital for professional bloggers aiming to rank high in search engines. However, the Yoast SEO Premium plugin costs $1.99/month. While Yoast is an excellent tool, the free version of Yoast SEO is highly capable for beginners, and understanding core SEO principles through a dedicated course and utilizing other keyword research tools (often subscription-based and separate from plugins) will be more impactful in the long run.
4. Enter Your Credit Card Information and Submit
With your hosting plan and optional add-ons selected, the final step in the registration process is to enter your credit card information and click “Submit.” It’s important to note that your hosting plan will automatically renew at the end of its term unless you proactively contact Bluehost customer support at +1 888 401 4678 to cancel. In my humble opinion (IMVHO), this automatic renewal is a beneficial feature, as it prevents accidental loss of your website due to forgotten renewals. It provides continuous uptime and peace of mind.
5. Allow Your WordPress Installation to Finish
Congratulations! You’ve successfully secured your web host. Now that Bluehost is managing the technical infrastructure, the next phase involves the automatic installation of WordPress. Bluehost is designed for ease of use, and for new accounts, it typically automates the WordPress installation process. This means you won’t have to manually download or upload any files. Once the installation is complete, you’ll receive confirmation and be ready to begin setting up your WordPress blog.
💻 How to Set Up a WordPress Site on Bluehost: Your First Steps
Now that your WordPress installation is complete, you’re probably wondering, “How do I launch my WordPress site on Bluehost?” There are two primary and convenient ways to access your WordPress dashboard, the control center for your new blog.
The first method involves logging into your Bluehost dashboard and then seamlessly transitioning to your WordPress dashboard from there. To do this, simply navigate to Bluehost’s login page and click “log in” located in the upper right corner of the screen. You’ll then enter your newly registered domain name and your chosen password. This will grant you access to your Bluehost hosting control panel, which also serves as a gateway to your WordPress site.
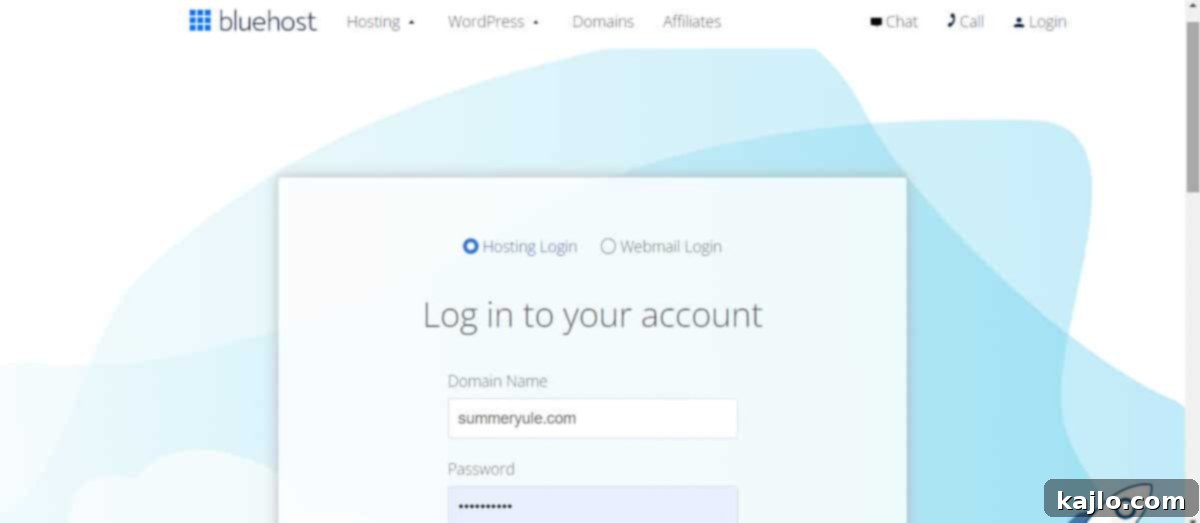
Once inside your Bluehost dashboard, you can easily reach your WordPress dashboard by clicking on the “My Sites” option in the left-hand menu. This will display all your WordPress installations, allowing you to manage them or log directly into their respective dashboards.
The second, and often quicker, way to access your WordPress dashboard is by typing yoursite.com/wp-admin directly into your web browser (replacing “yoursite.com” with your actual domain name). This will take you to the WordPress login screen, where you’ll use the credentials created during the Bluehost setup process. Here’s a glimpse of what my WordPress dashboard looks like:
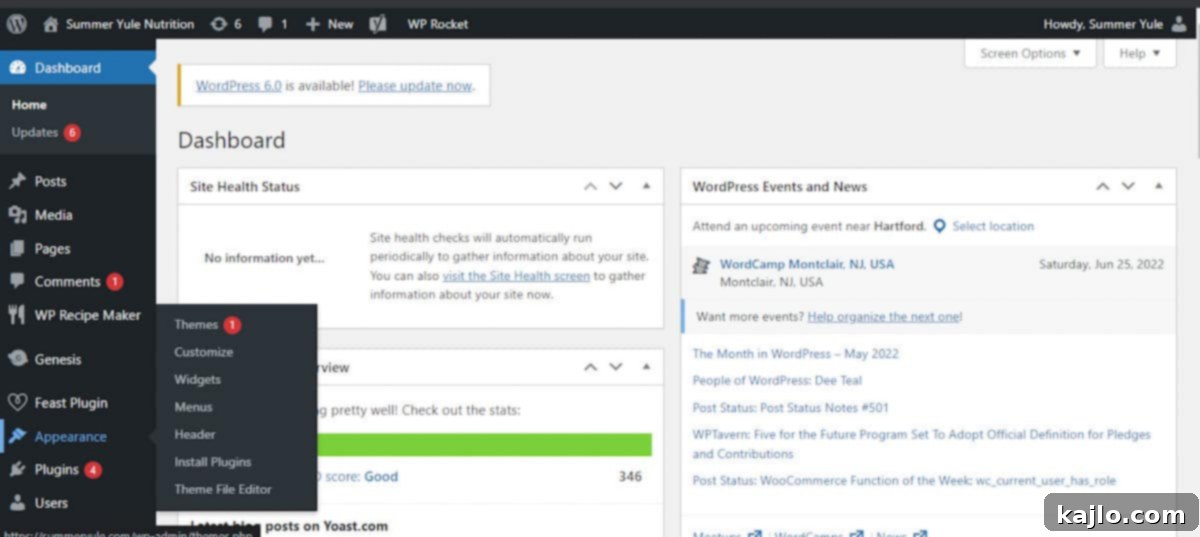
Keep in mind that my dashboard, having been in use for years of blogging, appears more complex than yours will as a beginner. Your new dashboard will be much cleaner and more streamlined. One of the very first and most exciting tasks you’ll undertake when starting your blog is selecting a WordPress theme under the “Appearance” section. This theme will dictate the visual design and layout of your entire website.
🤑 How to Get a Free Theme in WordPress with Bluehost?
Once you’re in your WordPress dashboard, finding a theme is incredibly straightforward. Navigate to Appearance > Themes > Add New. Here, you’ll discover a vast repository of free WordPress themes that can instantly transform the look and feel of your blog. These themes are developed by the WordPress community and often provide excellent starting points for new bloggers.
While exploring, remember that as your blog grows and potentially transitions into a business, you might consider upgrading to a premium (paid) theme later on. Premium themes often offer more advanced features, customization options, and dedicated support, which can be beneficial for monetized or high-traffic sites.
Among the multitude of free options, Astra and Kadence are widely regarded as two of the best free Bluehost themes specifically optimized for blogs. Both are celebrated for their exceptional speed, clean and modern designs, and user-friendly customization interfaces. They provide a solid foundation for any blog and are highly extensible. Notably, Kadence also offers a seamless upgrade path to a paid version if you decide to expand its capabilities in the future.
When I initially started this blog as a hobby project, I opted for the ColorMag theme. While I still appreciate ColorMag’s design aesthetics, I must admit it’s not the fastest theme available on the market. If you are starting purely as a hobbyist, my advice is to choose a theme whose design you genuinely love. The beauty of WordPress is its flexibility; switching themes later is a relatively simple process, so don’t feel locked into your initial choice.

✍️ How to Create Your First Blog Post on WordPress
Once you have a theme successfully installed and activated, posting to WordPress becomes an intuitive and rewarding process. To begin creating your very first blog post, simply navigate to Posts > Add New in your WordPress dashboard’s left-hand menu. This action will direct you to the WordPress editor screen, often referred to as the Gutenberg block editor, which is designed for a visually rich content creation experience.
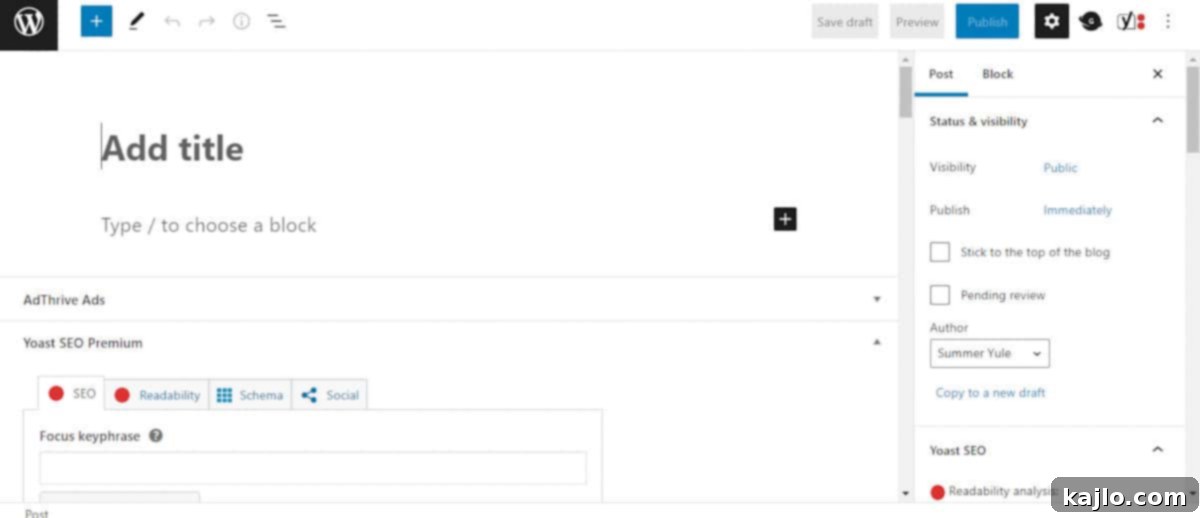
Upon entering the editor, your attention should first turn to the right-hand column, which contains important settings for your post. Here, you can decide when you want your post to be published – either immediately or scheduled for a future date and time. It’s also where you’ll add a compelling featured image, which serves as the primary visual for your post, often displayed on your blog’s homepage or social media shares. Additionally, you can assign your post to one or more relevant categories, helping organize your content for visitors. As a note for beginners: while WordPress allows for tags, I generally advise against overusing them as they can create numerous “thin content” pages, which can negatively impact your search engine optimization (SEO). When I was first learning how to start a WordPress blog with Bluehost, I inadvertently created a mess with excessive tags that took months to rectify.
Next, shift your focus to the main editing area in the left and center columns. This is where you’ll add your captivating title and begin writing the body of your post using the intuitive block editor. WordPress utilizes a block-based system, meaning every element – from paragraphs and headings to images and videos – is a distinct “block.” If you click beneath an existing block or on the “+” icon, you’ll see options to add various media types, such as images, videos, galleries, and more, enriching your content visually and interactively.
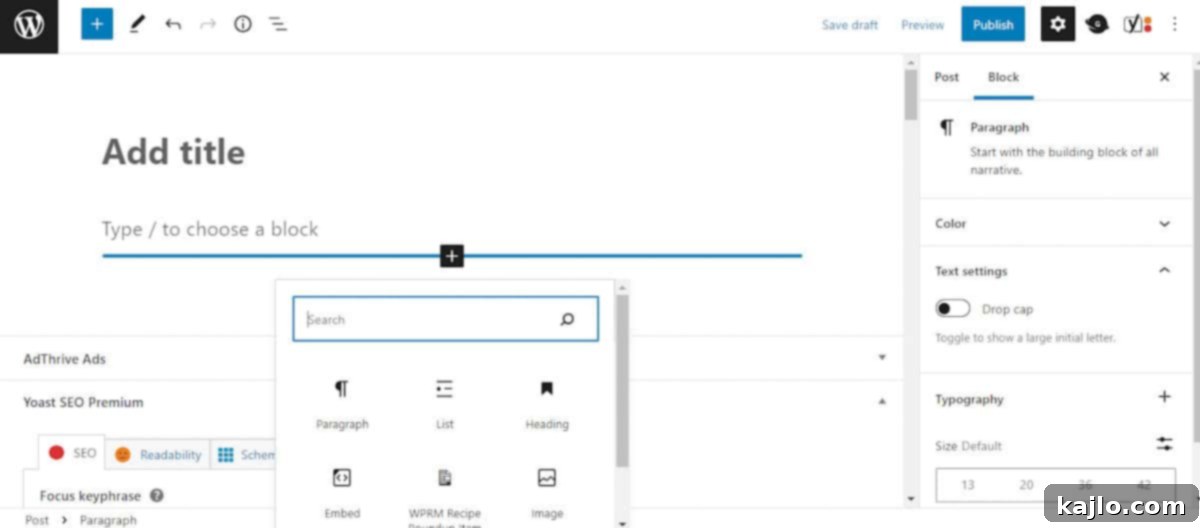
To ensure your blog posts are both engaging and optimized for modern audiences, especially those browsing on mobile devices, here are a few quick but essential writing and formatting tips:
- Keep Paragraphs Concise: Aim to limit your paragraphs to no more than 2-3 sentences. Shorter paragraphs improve readability and prevent large blocks of text that can overwhelm mobile users.
- Use Shorter Sentences: Strive for sentences that are typically no more than 20 words. This enhances comprehension and keeps your content flowing smoothly.
- Break Up Sections with H2 Headers: Employ H2 (Heading 2) headers to logically divide your content into digestible sections. These not only improve readability but also aid search engines in understanding your post’s structure and main topics.
- Maintain Section Length: Keep the text between H2 headers under 300 words. This ensures that readers can easily scan your content and find the information they need without feeling lost in long passages.
- Incorporate Visuals and Lists: Utilize bulleted or numbered lists and integrate a generous number of high-quality images, infographics, and even videos throughout your post. Visuals break up text, illustrate points, and significantly boost engagement.
These formatting and writing practices are not only beneficial for enhancing user experience on mobile devices but are also highly regarded by search engines as strong SEO signals. Once you have meticulously crafted and reviewed your post, click the “Publish” or “Schedule” button located in the upper right corner of the screen. Congratulations, you’ve successfully created and published your first WordPress blog post!
📝 Additional Key Tips for Starting a Blog on WordPress.org
As you embark on your blogging journey, it’s crucial to understand a fundamental distinction that often confuses beginners: the difference between WordPress.org and WordPress.com. This clarification is vital for establishing a successful, scalable, and monetizable blog.
While WordPress.com offers a free platform to set up a blog, it comes with significant limitations. On WordPress.com, you don’t truly own your domain name. Instead, your blog is hosted on a subdomain of WordPress.com, meaning your URL would look something like this: `https://yoursitenamehere.WordPress.com/`. This limits your control over advertising, customization, and often comes with WordPress.com branding.
In contrast, with WordPress.org (which is what you get with Bluehost), you gain full ownership of your actual domain name and complete control over your website. This means your URL will simply be `https://yoursitenamehere.com/`. This complete ownership is precisely why we’ve gone through the detailed steps of learning how to start a blog with Bluehost and WordPress. It grants you the freedom to monetize your site, install any plugins, customize every aspect of your design, and scale your blog without restrictions, setting you up for long-term success.
🔌 Essential WordPress Plugins to Enhance Your Blog
Plugins are powerful extensions that add new features and functionalities to your WordPress site, helping it run smoother, more securely, and more efficiently. To explore and manage plugins, simply click on “Plugins” in the left-hand menu of your WordPress dashboard. While there are thousands of plugins available, it’s wise to be selective. Here are some highly recommended plugins for blogging beginners:
- Jetpack: Often referred to as the “Swiss Army knife” of plugins, Jetpack offers a comprehensive suite of features. From site statistics and security tools to performance optimizations and related posts, it covers many essential needs. A notable feature integrated with Jetpack is Askimet, a robust and highly effective filter against spam comments, keeping your comment sections clean and professional.
- Wordfence Security: Regardless of your site’s size, it’s a target for malicious attacks. Wordfence is a leading security plugin available in both free and paid premium versions. I highly recommend installing either version immediately to protect your site from malware, brute-force attacks, and other vulnerabilities. (Advanced Bluehost blogger tip: For an additional layer of security and performance, consider switching your nameservers to Cloudflare, which provides a free CDN and advanced firewall protection.)
- Yoast SEO: This is a highly popular and indispensable plugin for understanding and implementing basic on-page SEO. Yoast provides actionable recommendations to optimize your content for search engines, helping you improve your blog’s visibility. It offers a free version that is more than sufficient for beginners. (A word of caution: while Yoast’s green/red light system is helpful, don’t get too fixated on achieving all green lights, as it can sometimes lead to unnatural writing. Focus on creating high-quality, relevant content first.)
- WP Recipe Maker: If your blog involves sharing recipes, using a dedicated recipe card plugin is essential for both user experience and SEO. WP Recipe Maker is an excellent choice, offering beautiful, customizable recipe cards that are easily embeddable and schema-optimized, meaning search engines can better understand and display your recipes in search results. I personally use and highly recommend it for its extensive features and customization options.
As much as I appreciate the utility of certain plugins, it’s crucial to adopt a minimalist approach to their usage. A common pitfall for beginners is installing too many plugins. While they offer great functionality, a large number of plugins can lead to conflicts, slow down your site’s performance, and create potential security vulnerabilities. When I first started, I had nearly 40 plugins; I’ve since streamlined my site to under 20, proving that “less is more” when it comes to plugins.
Furthermore, avoid setting your plugins to auto-update immediately. New plugin updates, while beneficial, sometimes come with bugs that can temporarily disrupt your site. It’s often best to wait a week or two after an update is released to allow developers to iron out any unforeseen issues. This cautious approach can save you from potential site-breaking problems.
🏆 Other Essential Tools and Services for Your WordPress Blog
Beyond hosting and WordPress, several external tools and services are absolutely essential for the growth, monitoring, and monetization of your new blog. I highly recommend registering your blog with the following platforms:
- Google AdSense: This is an excellent starting point for monetizing your blog with display advertisements from day one. While AdSense typically doesn’t offer the high payout rates of premium ad networks like AdThrive or Mediavine, it has much lower traffic requirements, making it accessible for new blogs. It allows you to start earning some revenue (even if just a few cents initially) to offset your blogging expenses.
- Google Analytics 4 (GA4): GA4 is indispensable for gaining deep insights into your website’s performance and audience behavior. It provides detailed data on how visitors find your site, what content they engage with, their demographics, and much more. This information is not only critical for your own strategic planning but also requested by ad networks and potential partners. Understanding which social media channels are effectively driving traffic can significantly influence your content and promotion strategies.
- Google Search Console: Complementing Google Analytics, Search Console offers more specific data on how your site is performing directly within Google Search. It helps you monitor your site’s indexing status, identify search queries that lead to your site, detect crawl errors, and even submit sitemaps. This tool is crucial for optimizing your SEO and ensuring your content is discoverable.
- Mailchimp: Your email list is arguably one of the most valuable assets you can cultivate for your blog. Unlike social media algorithms or Google updates that can drastically impact your reach, your email list belongs entirely to you. Mailchimp offers a free plan for up to 2,000 subscribers, making it an excellent choice for beginners to start building an audience and engaging directly with their readers. As your list grows, you might consider more advanced platforms like ConvertKit, which is highly popular among professional bloggers.
Speaking of connecting with your audience…
Join our growing community! Subscribe now to receive the latest and greatest recipes, exclusive content, and invaluable blogging tips directly in your inbox. Plus, connect with me on social media: follow us on Facebook, Pinterest, Instagram, and YouTube! Your engagement helps our community thrive.
🔐 How to Safely Back Up Your WordPress Site on Bluehost
Protecting your website with regular backups is one of the most critical practices for any blogger. A reliable backup ensures that you can restore your site to a previous state in case of data loss, hacking attempts, or critical errors during updates. Bluehost’s Choice Plus and Pro plans offer the significant advantage of automated daily backups for the first year, providing excellent peace of mind.
However, if you’ve opted for the Bluehost Basic or Plus plans, automated backups are not included by default. In this scenario, you have a couple of excellent options. You can choose to add Codeguard Basic to your hosting package for an additional $2.99 per month. This service provides automatic daily backups of your entire site, with easy one-click restoration capabilities. It’s a convenient and hands-off solution for ensuring your data is always protected.
Alternatively, for those on a tighter budget, several free WordPress plugins can help you manage your backups. When I was using the Bluehost Basic plan, I relied on Jetpack’s backup features. Another highly recommended and robust free plugin is UpdraftPlus. This plugin allows you to schedule automatic backups to various cloud storage services like Google Drive, Dropbox, or Amazon S3, and it simplifies the restoration process. Regardless of your chosen method, I cannot stress enough the importance of regularly backing up your site to safeguard your valuable content and hard work.
Bluehost and WordPress Alternatives: Exploring Your Options
While Bluehost and WordPress.org form a powerful duo for building a professional blog, it’s worth noting that other avenues exist for content creation and audience engagement. For instance, you can create video content and monetize it on platforms like YouTube or TikTok. However, relying solely on social media channels as your primary platform has inherent risks and limitations compared to building your own self-hosted website.
Let’s delve into why establishing your own platform for reaching your audience can provide a more secure and potentially higher income stream:
If your main content platform is a social media channel, such as TikTok or Instagram, your audience and reach are largely at the mercy of platform algorithms. Sudden algorithm changes can drastically reduce your visibility and engagement overnight, effectively cutting off your connection to your followers. Moreover, social media platforms can decline in popularity or even disappear (think MySpace), taking your entire audience with them. A self-hosted blog ensures that your audience list and content remain under your control, independent of external platform whims.
Another significant issue with relying solely on social platforms for monetization is that they act as middlemen, taking a substantial cut of your potential earnings. For example, top ad networks like Mediavine and AdThrive (now CafeMedia) typically pay U.S. bloggers anywhere from $20-$35 or more per 1,000 page views, depending on niche and audience demographics. In stark contrast, I’ve heard reports that TikTok, for instance, may only pay 2-4 cents per 1,000 views. This means a video watched on your self-hosted website, integrated with an ad network, could potentially earn you up to 30 times more than the same video viewed on YouTube. Additionally, social media platforms often demand a constant stream of new content to maintain engagement and earning potential, which can lead to content burnout.
While social media undoubtedly serves as an excellent tool for audience expansion, driving awareness to your brand, and building community, relying on it as your sole income source for blogging or content creation is, in my opinion, not the most strategic or secure approach for long-term financial stability.
Bluehost Web Hosting Alternatives: A Comparison
Of course, Bluehost isn’t the only web hosting provider on the market. Depending on your specific needs, budget, and technical expertise, you might consider alternatives. Here’s a cost comparison chart of some popular web hosting options to help you make an informed decision:
| Host | Cheapest Entry Plan | Key Resource Limit/Feature | Ideal For |
|---|---|---|---|
| Bluehost | $2.95 per month | 10GB SSD Storage, 1 website | Beginners, budget-conscious bloggers, easy WordPress setup. |
| GoDaddy | $7.99 per month | 25GB Storage, 1 website | Those already familiar with GoDaddy’s domain services, sometimes pricier for hosting. |
| Cloudways* | $14 per month | 1GB RAM, 25GB Storage, 1TB Bandwidth | Growing sites, users needing managed cloud hosting, excellent performance. |
| SiteGround | $17.99 per month | 10GB Webspace (approx. 10K visitors/month) | Users prioritizing speed and advanced features, higher performance. |
| WP Engine | $20 per month (currently on sale) | 10GB Storage, 50GB Bandwidth (approx. 25K visitors/month) | Premium managed WordPress hosting, high-performance, excellent support. |
| BigScoots | $6.95 per month | 5GB SSD Storage | Smaller sites with specific performance needs, often niche-focused. |
*Cloudways is the robust cloud hosting provider I transitioned to once my site experienced significant growth and high traffic volumes. This move highlights that while Bluehost is excellent for starting, scaling options are available as your blog flourishes.
🥇 Is Bluehost a Good Choice for Blogging?
In summary, based on its features, pricing, and user-friendliness, Bluehost consistently stands out as the premier web host for blogging beginners. Its affordability, intuitive interface, and responsive 24/7 customer support make it an unrivaled choice for those just starting their online journey. If your goal is to create a professional, self-hosted website without breaking the bank and with minimal technical hurdles, I wholeheartedly recommend Bluehost for blogging. It provides a solid, reliable foundation upon which you can build and grow your digital presence.
For a limited time, readers of Summer Yule Nutrition and Recipes can take advantage of a special, exclusive deal! Don’t miss this opportunity to save money on Bluehost web hosting and kickstart your blogging dream. Click the button below to secure your discount today!
FAQs About Starting a Blog with Bluehost and WordPress
Here are answers to some of the most frequently asked questions about using Bluehost with WordPress:
Do I have to pay for WordPress if I have Bluehost?
No, you do not have to pay for WordPress itself if you have a Bluehost hosting plan. WordPress.org, the self-hosted version of the content management system, is open-source and completely free to use. Bluehost simplifies the process by offering a one-click installation of WordPress into your hosting account, so there are no separate fees for the software.
How much money do I need to start a blog on WordPress?
You can start a self-hosted blog on WordPress with Bluehost for as little as $2.95 per month, making it an incredibly budget-friendly option for beginners. This typically covers your hosting and a free domain name for the first year. The most expensive shared hosting package Bluehost offers is currently $13.95 per month. Keep in mind that optional add-on packages for the basic plan, such as automated backups (Codeguard Basic) or premium SSL certificates, can increase your overall monthly expense. For more advanced bloggers or high-traffic sites, Bluehost also provides Virtual Private Server (VPS) plans ranging from $29.99 to $69.99 per month, and dedicated server options costing $89.98 to $139.99 per month.
Does Bluehost charge monthly?
Bluehost does not offer month-to-month payment plans for their shared hosting services. Instead, they typically charge in larger increments, most commonly for 12-month or 36-month periods. This allows them to offer significantly lower introductory rates compared to what a monthly plan would cost.
Can we use Bluehost without WordPress?
Yes, you can certainly use Bluehost without WordPress. Bluehost is a general web hosting provider that supports various types of websites. If you have the technical expertise, you could manually build your website using HTML, CSS, and other programming languages, then upload those files to your Bluehost server. However, WordPress powers over 40% of all websites on the internet for a reason: its user-friendly interface and extensive features make website management far easier for most users. Given that it’s included for free with Bluehost, there’s little reason not to take advantage of its capabilities.
How do I install a free SSL certificate on Bluehost to move a WordPress site to HTTPS?
All Bluehost customers receive a free Let’s Encrypt SSL certificate, which is automatically installed and activated for your domain. This ensures your website uses HTTPS, providing secure connections for your visitors and improving your site’s SEO. According to Bluehost, these should typically install and activate themselves without any action required from you. In the rare event that you need to manually enable your SSL certificate, Bluehost provides detailed instructions on how to do so here within their knowledge base.
Blogger or WordPress – which is best?
For individuals serious about monetizing their site, gaining full control over their content, and having extensive customization options, WordPress.org (especially with a host like Bluehost) is undeniably the superior choice. Blogger, owned by Google, is a free blogging platform that offers simplicity but comes with more limited features, fewer customization options, and less control over monetization. While you can purchase your own domain name for a Blogger site, the overall flexibility and growth potential of WordPress.org for professional endeavors are far greater.
Is Bluehost recommended by WordPress?
Yes, Bluehost is one of the hosting providers officially recommended by WordPress.org, a distinction it has held since 2005. This recommendation speaks volumes about its reliability, compatibility, and ease of integration with the WordPress platform. When you sign up with Bluehost, the latest version of WordPress is automatically installed in your new account, making the setup process seamless.
How do Bluehost and WordPress work together?
Bluehost and WordPress serve complementary but distinct roles. Bluehost provides the essential web hosting account, which is the physical server space and infrastructure that makes your website accessible on the internet. WordPress, on the other hand, is the content management system (CMS) that you use to create, organize, and publish all your website’s content, from blog posts to pages. Essentially, you need a host like Bluehost to provide the foundation (the “land” and “house”) for your website, and WordPress acts as the robust toolset (the “interior design” and “furnishings”) that allows you to build and manage your online presence within that foundation.
Do I get Bluehost or WordPress first?
If you are creating your very first blog, the most logical and straightforward approach is to sign up for Bluehost first. Once your Bluehost hosting account is established, you can then utilize Bluehost’s incredibly user-friendly, one-click WordPress installation process to automatically set up WordPress for your self-hosted blog. This integrated approach ensures that WordPress is correctly configured with your hosting environment from the start, simplifying the entire setup process for beginners.
What are the four types of blogs?
While blogs can be categorized in many nuanced ways, a common and broad classification often identifies four main types: personal blogs, business blogs, niche sites, and affiliate blogs. It’s important to note that many successful blogs can often be a combination of these types, blending personal insights with business goals or leveraging a niche focus for affiliate marketing opportunities.
- Personal Blogs: Focused on the individual’s experiences, thoughts, and daily life.
- Business Blogs: Created by companies to promote their brand, products, or services.
- Niche Sites: Highly specialized blogs dedicated to a very specific topic or audience.
- Affiliate Blogs: Primarily designed to promote products or services from other companies, earning commissions on sales.
Other Helpful Articles You May Enjoy
Now that you’ve successfully learned how to create a WordPress blog on Bluehost and are set to embark on your digital journey, here are some other life-enhancing articles from my site that you might find valuable:
- How to Lose Weight Permanently: My Proven Strategy
- Discover my favorite weeknight dinner hack, MyPlate Meals: The Ultimate Meal Game Changer
- Green Chef vs Hello Fresh Review (Perfect for when you want to save on gas and have no time for grocery shopping, making healthy dinners easier)
